 The LiteSpeed Web Server is a highly scalable PHP web server with high performance and low memory consumption. It is built based on the best practices of the PHP hosting, utilizing the benefits of both Apache and NGINX implementations, and integrating its own optimizations.
The feature-rich structure of the LiteSpeed application server includes the following specifics:
- An event-driven architecture (like NGINX) consumes fewer resources than an Apache process-based model, ensuring better performance with minimum memory and CPU usage;
- Full compatibility with commonly used Apache features including mod_rewrite, .htaccess, and mod_security.
- Individual optimization for the most popular cms platforms (e.g., WordPress, Magento, Drupal, Joomla, etc.);
- ESI cache, CSS and JavaScript optimization, image optimization, browser and object cache support, CDN support, built-in WAF, Geo-DNS, CAPTCHA, IP throttling, cutting-edge anti-DDoS features, etc.
Jelastic PaaS supports LiteSpeed Web Server out-of-the-box to provide a secure, efficient, and scalable application server for PHP hosting in the cloud. According to benchmark tests, the LiteSpeed performance capacity varies from just a few times up to ten times higher than the main competitors such as Apache and NGINX web servers. Below you’ll see the results of the benchmark tests, as well as how to install, configure, and track performance of LiteSpeed Web Server within Jelastic PaaS.
LiteSpeed Web Server Installation
1. Log in to your Jelastic PaaS account and click New Environment at the top.

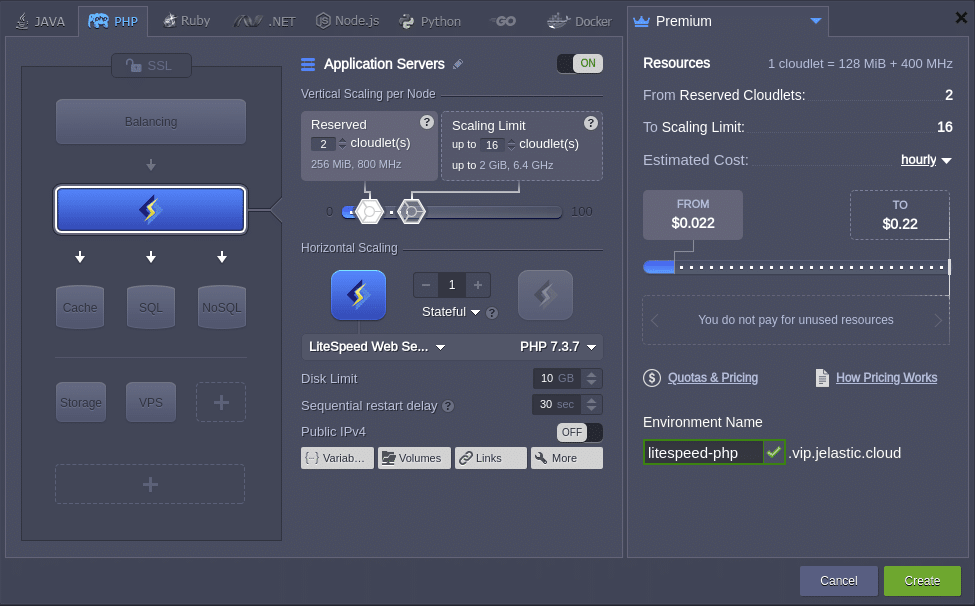
2. Within the opened topology wizard, switch to the PHP tab and select LiteSpeed Web Server as your application server. Set other configurations up to your needs (e.g., cloudlets limit, Public IP’s, region, etc.).
3. Once the environment is created, you can click on the Open in Browser button next to the application server.

4. Within the opened default page, you’ll see your application server’s phpinfo information.

The environment is ready for your PHP application to be deployed.
LiteSpeed Web Server Administration
In contrast to Apache or NGNIX, LiteSpeed Web Server is configurable via a WebAdmin console by default and can be reached using the URL and credentials provided in the respective email after installation.
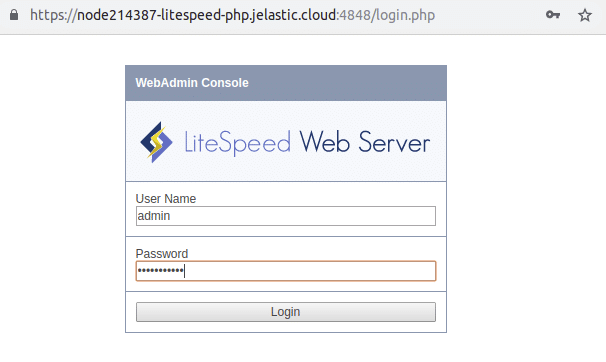
The WebAdmin Console is a very well documented application that has a user-friendly self-described interface with three main areas: General, Configuration, and WebAdmin Console.
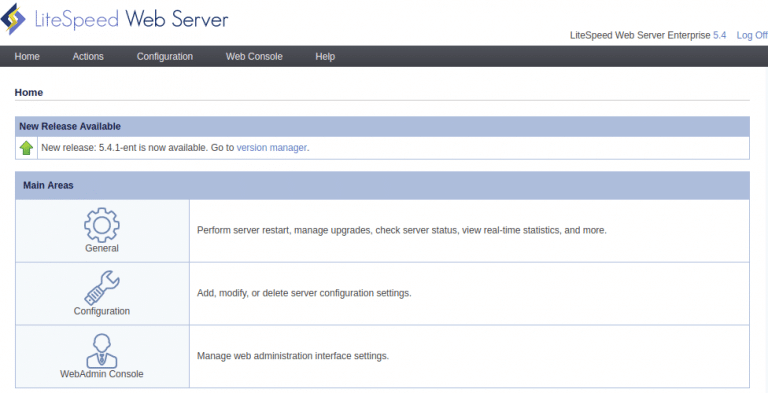
LiteSpeed Web Server General Area
The General area allows you to perform common operations with a regular web server using the following options:
- Restart – restart the web server, detached php processes, and virtual hosts;
- Toggle Debug Logging – enable/disable debug level logging in an emergency manner and includes detailed information for each request and response (always set debug level to NONE if you do not need detailed debug logging because debug logging will severely degrade service performance and potentially saturate disk space in a very short time);
- Server Log Viewer – display server logs of different levels using a user-friendly representation;
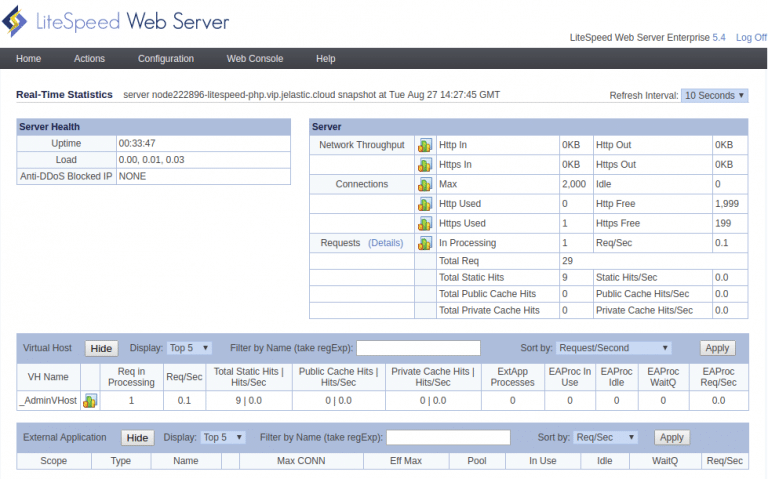
- Real-Time Stats – powerful tool to carry out server workload analysis;
- Version Manager – perform web server version updates;
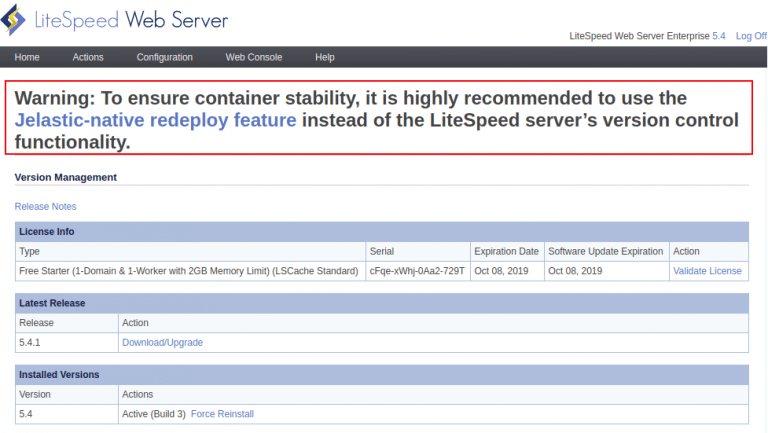
In order to keep your environment compatible with the Jelastic PaaS platform, it is strongly recommended to use the Redeploy Containers functionality via the dashboard and not to use the LiteSpeed Version Management (use only if you are confident in your actions).

- Compile PHP – compile PHP for LiteSpeed Web Server.
LiteSpeed Web Server Configuration Area
The Configuration area provides tools to configure the following options:
- Multiple Server parameters;

- Listeners;

- Virtual Hosts;

- Virtual Host Templates;

LiteSpeed Web Server Security Configuration
LiteSpeed Web Server was initially designed to be resistant to a large number of threats and effective workload handling. The following security parameters can be managed:
- WordPress Brute Force Attacks Protection – protect shared hosting WordPress environments from large-scale brute force attacks, which have the potential to bring down entire servers, trying to gain access to a website by repeatedly attempting to guess a valid username and password;
- Web Application Firewall (WAF) – built-in security features to block bad connections. It allows you to enable ModSecurity, allowing sophisticated rules for filtering out attacking requests by checking for known attack signatures. LiteSpeed Web Server also works well with popular mod_security rule sets such as Owasp, Atomicorp, Comodo and CloudLinux Imunify360. A big difference compared to Apache or other web servers is that LiteSpeed WAF can manage specifically rules for dynamic requests. This means that computing power can be significantly optimized;
- Per Client Throttling – connection control settings based on a client IP. These settings help to mitigate DoS (Denial of Service) and DDoS (Distributed Denial of Service) attacks;
- File Access – set of rules for controlling and managing the state of access rights, symbolic links and permission masks to the web server files;
- CGI Settings – control Common Gateway Interface processes. Memory and process limits also serve as the default for other external applications if limits not have been set explicitly for those applications;
- Access Denied Directories – directories that should be blocked from access. Add directories that contain sensitive data to this list to prevent accidentally exposing sensitive files to clients. Append a “*” to the path to include all sub-directories. If both “Follow Symbolic Link” and “Check Symbolic Link” are enabled, symbolic links will be checked against the denied directories;
- Access Control – specifies what sub networks and/or IP addresses can access the server. At server level, this setting will affect all virtual hosts. You can also set up unique access control to each virtual host at the virtual host level. Virtual host level settings will NOT override server level settings.
LiteSpeed Cache High-Performance
LiteSpeed Cache (LSCache) is included as a built-in, high-performance dynamic content acceleration feature in the LiteSpeed Web Server. The LSCache comes by default in Free Starter, Site Owner, Web Host, and legacy 8-CPU license. Dynamic website content is accelerated by LSCache with features similar to mod_cache in Apache, but highly efficient and customizable through it’s native implementation.
LSCache allows to avoid the usage of an extra reverse-proxy layer required by other add-on cache packages (such as Varnish) that consequently translates into higher efficiency of static assets in addition to handling of dynamic content.
It is strictly recommended using specially designed plugins for your application that coincide with one from this list. Otherwise, the LSCache can be enabled globally (not recommended) or for a specified virtual host.
Here we demonstrate how to enable LSCache for dynamic content of a demo website based on the phpinfo() function usage.
As shown earlier above, the environment created from the Jelastic PaaS certified stack template has this function already implemented in the default webpage (index.php), and which is accessible by clicking on the Open in Browser button.
Open it and then turn on the Developer tools by pressing F12 or Ctrl+Shift+i in case of Chrome web browser. See the Response Headers section for your website (virtual host).
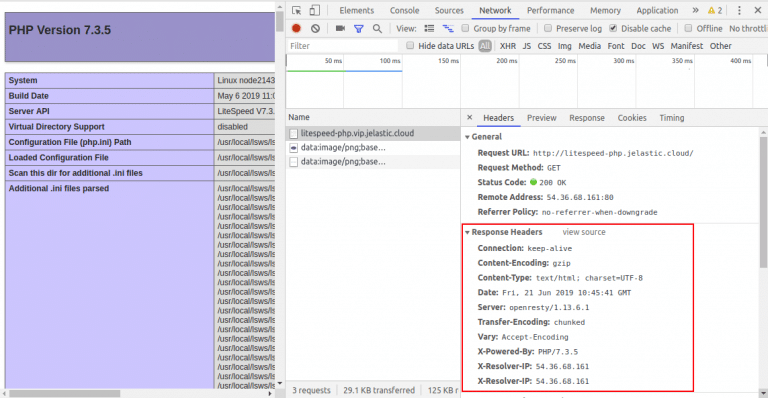
You can observe there is no information regarding content caching.
To make it a caching response, do the following:
1. Open Configuration File Manager, go to the root context directory of your virtual host (/var/www/webroot/ROOT directory in this case).
2. Then create a New File and name it as .htaccess.
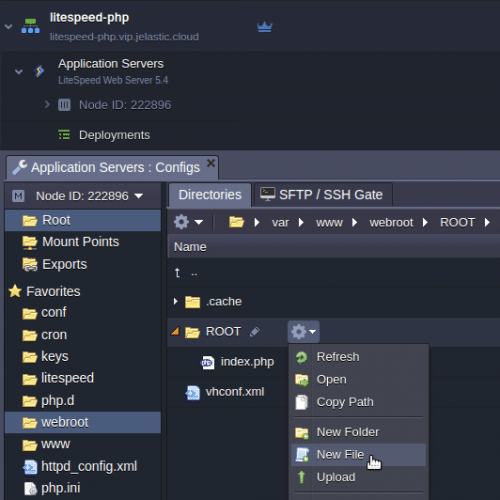
3. Add the following lines to the .htaccess file:
<ifmodule litespeed="">
  RewriteEngine On
  CacheLookup on
  RewriteCond %{REQUEST_METHOD} ^HEAD|GET$
  RewriteRule .* – [E=Cache-Control:max-age=120]
</ifmodule>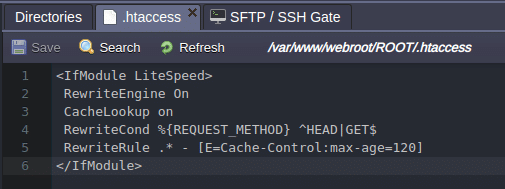
4. Save the changes, refresh the webpage of the website, and take a look at the Response Headers section once again.
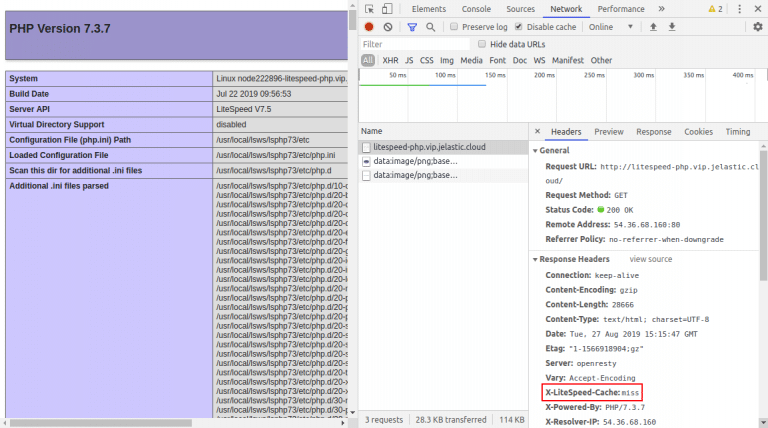
A new line X-Litespeed-Cache: miss was added to the Response Headers that means LSCache was enabled for the website (virtual host), but it’s not cached yet since we observe the miss as a status. In order to make it cached, refresh the webpage one more time, and take a look at X-Litespeed-Cache header.
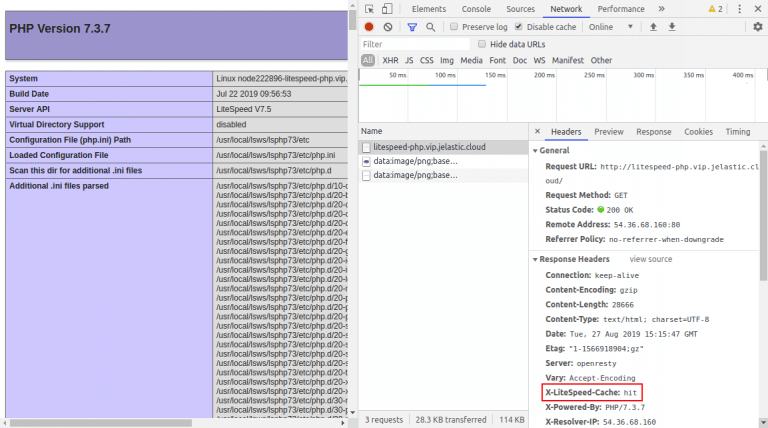
This time, the cache status was changed to hit, meaning that the dynamic content was loaded from the cache of your virtual host.
The .htaccess config file can be complemented with many other directives that you consider relevant.
LiteSpeed Web Server Comparative Benchmark Test
In order to compare the LiteSpeed Web Server and other most popular web servers (Apache and NGINX) performance, you can do benchmarking in a few minutes within the Jelastic PaaS dashboard using ApacheBench (ab) utility as a workload source and a simple php script as a responding application.
1. Create three environments with the latest versions of Apache, NGNIX and LiteSpeed Web Server.
2. Create a php script in every ROOT directory of all three web servers via the Configuration File Manager as follows:
<?php echo “hello world”; ?>
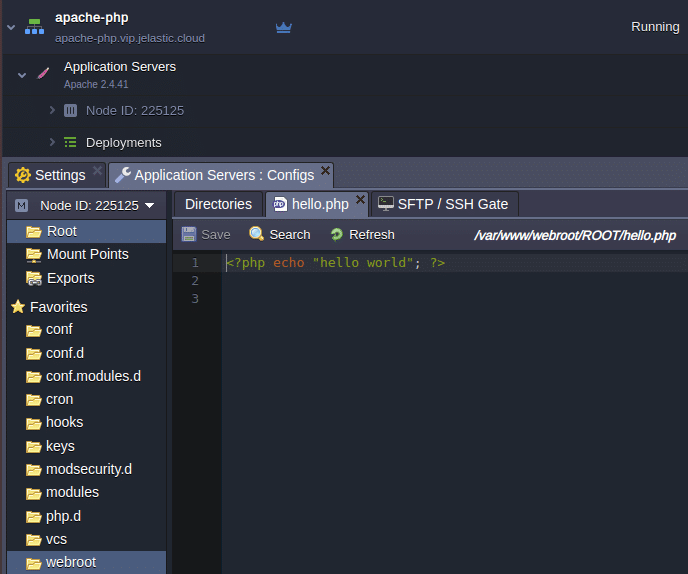
3. Create a testing environment using the same Apache Web Server template which will be generating requests to measure web server performance.
4. Open a terminal via Web SSH on the testing environment application server and run the following command for each destination environment, filtering command’s output by parameter Requests per second with help of the grep utility. This parameter indicates the number of requests that a responding web server can serve in one second:
ab -n 10000 -k -q -c 100 http://${env.domain}/hello.php | grep Requests
5. Finally, compare the results. The greater the number, the better the web server performance.

Obviously, the LiteSpeed Web Server is the unconditional winner.
LiteSpeed Web Server Pricing
Being commercial software, LiteSpeed Web Server requires a license to be installed. Specifically for Jelastic PaaS, a more flexible pricing model was created for LiteSpeed servers that suits dynamic cloud environments. You can start with free licenses using up to 2GB per environment, and afterwards the price will depend on the tiers according to the RAM usage.
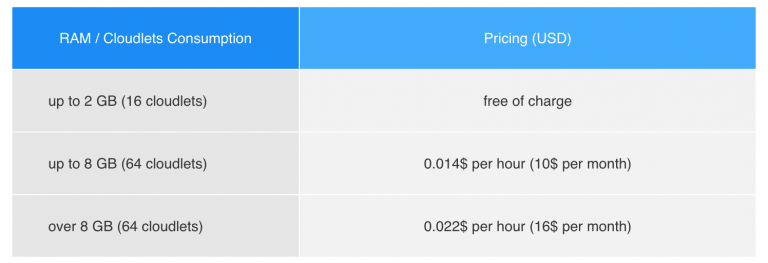
- Pricing may vary depending on the country and chosen service provider. Herewith, all the account charges can be viewed via the Billing History in the Jelastic PaaS dashboard;
- Change Interval to hour in order to get a better understanding for what you are paying for.

Now you see how easy it is to get LiteSpeed Web Server up and running, as well as what performance increase you can get with it migrating from Apache or NGINX web server. Major results make this solution a perfect choice for running applications like WordPress or Magento with heavy or variable load. LiteSpeed Web Server is already integrated to the pre-packaged Magento that can be installed in just one click.
Explore the benefits of high performance and high availability with the cutting edge LiteSpeed Web Server hosted at our Jelastic PaaS platform.
